
Below are step-by-step instructions for most tasks team members will need to do on this site, grouped by role. Depending on your role, you may not have access to all tasks listed.

Logging In

To log in, click on the "G" (Google icon) on the homepage and follow the prompts. You will ONLY be able to use the Google Login with your @contracostasar.org Google account.

Team Tracker homepage highlighting the G icon to login with Google

If you are a CoCo Sheriff's Office employee without a @contracostasar.org Google account and have a Team Tracker account, you can this alternate login option.

View and Update Your Profile

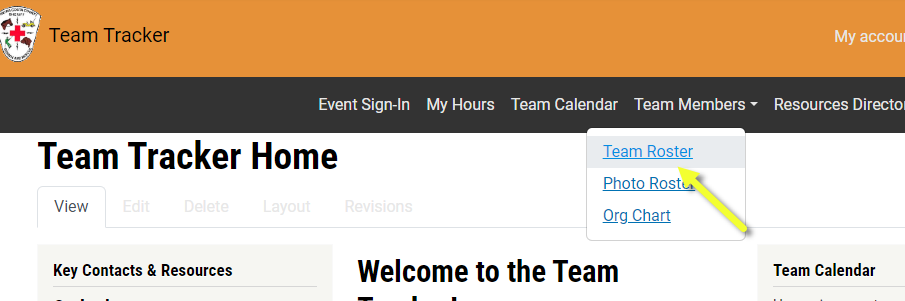
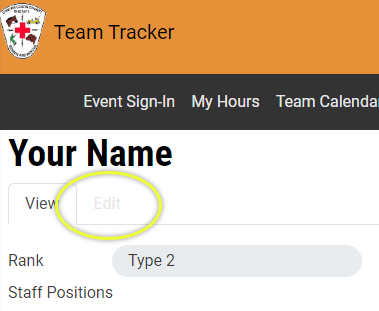
Go to your profile by clicking on the "My Account" link in the top menu.

From your profile page, click on the "Edit" tab under your name to make changes to your contact information.

View the Team Roster

From the menu in the black bar area, choose Team Members, then Team Roster. Or if you prefer a view of photos, choose Photo Roster.

Team Roster menu screenshot

You can search for team members by entering part of their first or last name in the Search field. The list will automatically update after entering at least 3 letters.

View the Team Organizational Chart

All staff positions are available for team members to view under the Team Members  menu - "Org Chart".

The org chart is structured left to right, with Captain in the first column, followed by Executive Officers, Lieutenant, Sergeants and Corporals. 

If you do not see your position listed, or would like to post an open position, contact Jon Kalan at jon.kalan@contracostasar.org.

View/Record Volunteer Hours

Hours Summary

To view hours that have been recorded, use the menu to navigate to "My Hours".

On this page, you'll find a summary of your hours grouped by month.

  • Hours: This is the total number of hours you have logged for the month, including both event sign-ins and "ad hoc hours".
  • # of Events: This is the number of events you signed into using Team Tracker (this does not include events that you signed into using a paper sign-in.
  • # of Ad Hoc Time Entries: This is the number of entries you made of ad hoc hours (not associated with an event sign-in).
  • Miles (optional, not used by SAR): Total number of miles you recorded for the month.

To view, edit or add hours to a given month, click the "View Details" link in the last column for the month you want to view.

Monthly Hours Details

On the monthly details page, you'll see each entry that has been recorded for the month. This will include both Event Sign-Ins and Ad Hoc Hours. Using the "Edit" or "Delete" links in the last column, you have the option to edit any of these entries to update the time or add details. You can also Delete any of the Ad Hoc Hours, but you cannot delete a Sign In.

To view details for a different month, click the "Return to Monthly Summary" link at the top of this page.

Enter Ad Hoc Hours

To record additional hours, click the "Enter Ad Hoc Hours" button at the top of the page. This is used for non-event time, like planning or communications, as well as for events you attended in the past and did not sign into using Team Tracker.

  • Sign In/Out: Be sure to enter a start and end time. The default start time is the current date and time, and the default end time is 1 hour from now. Adjust the date, start time and end time accordingly.
  • Time Type: Choose from the available options. Each option is defined at the bottom of this page.
  • Details: Brief description of the activity.
  • Mileage: (Optional) This is for your own tracking purposes.
  • Team Member: This will default to you, leave as is.

Click the Save button at the top of this page.

Recording Zero Hour Months

If you had no participation for a given month, you must explicitly and manually record that you had zero hours for the month(s). This is so Command Staff know you accurately had no hours and did not just forget to log them.

To do this, follow the section above to "Enter Ad Hoc Hours", except use these values:

  • Sign In/Out: Pick the first day of the month you want to mark with zero hours (i.e. 01/01/2025). Click the end time and choose the first "... (0 minutes)" entry.
  • Time Type: Pick "Training".
  • Details: Write in "Zero Hour Month".
  • Mileage: Leave empty.
  • Team Member: Leave as is.

Please be sure to do this for every single month you had zero hours on. If you visit the "My Hours" page and any past months are missing from the list, then it implies you have logged nothing for that month (actual hours or the zero hour entry).

Sign In/Out of an Event

Any event that is on the Team Calendar can be used to record your hours, provided that you sign in during the period in which sign in is available. This is generally defined as 1 hour before the event starts until 1 day after the event ends.

Find the Sign In button

There are 3 ways to Sign In to an event that is open for Sign In:

  1. From the menu, navigate to "Event Sign-In". This page lists all events that are available for sign-in. For the event you want to sign into, click the "Sign In" button in the far right column.
  2. From the Team Calendar, click on the name of the event. If sign in is open, you will see a "Sign In" button at the top of the page.
  3. If the person hosting the event chooses, they will make iPads available in "Kiosk mode". To sign in:
    • Click the "New Team Member Sign In" button at the top of the page.
    • Find your name on the list by scrolling or enter a few letters of your name in the search box at the top of the page.
    • Click the "Sign In" button next to your name.

Sign In Screen

After clicking the Sign In button using any of the 3 methods above, you are taken to the Create Sign In screen, shown below. Complete the fields as follows:

  • Sign In/Out: Review the start date and time listed, and adjust if neccessary. For example, if you are starting right now, you can leave this as the default (current date and time). If you are signing in now and you arrived earlier, or you want to record your travel time, you can adjust the Sign In Time accordingly
  • Duration: Leave as the default "Signed In" to show that you are currently signed in to the event. In this case, your Sign In has a start time and no end time, which is interpreted as actively signed in.
  • Click the Save button at the top of the screen.
Screenshot of sign in screen


Sign Out

Once you are signed in, you will see a Sign Out button in all of the same 3 places where you found the Sign In button. Click the Sign Out button, which will take you to the same Sign In information you initially entered. On this screen, you will change the end time to the time you are leaving/ending the event. You can choose one of the options from the drop down list, or adjust manually. 

screenshot of signout screen

Click the Save button at the top of the page.

Edit Sign In/Out

You can view any event you signed into from your My Hours page. Find the sign in entry on the monthly details page and click Edit. You can adjust the start or end time, or add mileage. But you will not be able to delete your sign in once it's been recorded.


Time Type Definitions for Hours

Logistics:
Includes vehicle, equipment, medical, technical and logistical maintenance and rehab activities, moving vehicles around lower lot, organizing Conex and storage areas, forms boxes, etc.

Meetings: 
Includes Team Meetings, After Action Reports (AARs) for searches and other events, and informational full team meetings.
Does NOT include social events like movie night, team picnics or holiday parties.

Staff Functions:
Time spent by Command Staff, Sergeants and Corporals on administrative duties, team development and management activities.

Search:
Includes missing person searches in person or any remote work being done to support a search (maps, missing person flyer, etc.)
Also includes metal detector, canine, DSAR or evacuation missions.

Training:
Includes in-person or online hours for students, trainees, instructors, proctors, and role players for full team training, medical training, resource training, etc.

Medical Detail:
Includes medical support for events, parades, races, and support for vaccination clinics.

Special or Other Detail:
Any non-search, non-training activity for the Sheriff's Office, local police departments, or other non-SAR agencies. Includes transporting equipment to crime scenes, EOC support, role player for SWAT or other law enforcement training, and similar activities.


Subscribe to the Team Calendar in Google Calendar

If you would like to be able to view the Team Calendar in your favorite calendar app, such as Google, the Team Calendar is available as an iCal feed. Follow the instructions below for Google Calendar. 

  1. On your computer in a browser, navigate to https://calendar.google.com/calendar/u/0/r/settings/addbyurl  
    1. Note: you cannot subscribe to another calendar from the Google Calendar mobile app, but once you subscribe from a browser, you'll be able to see all the calendars you subscribed to.
  2. Make sure you are logged into the Google account that you want to view the team calendar with. You can check which account you are logged into by clicking the photo or avatar in the top right corner of the page. Switch accounts if necessary.
  3. Enter this url in the URL for Calendar field:
    webcal://tracker.contracostasar.org/ical/team-calendar/export.ics
  4. Click Add Calendar

You will now be able to see the CoCoSAR Team Calendar alongside your calendar. You can toggle this off and on by checking the box in front of this calendar in the left navigation under Other Calendars:


You may be able to subscribe to this calendar using apps other than Google Calendar. Check the documentation for your app. The url of the calendar is:

webcal://tracker.contracostasar.org/ical/team-calendar/export.ics

NOTE: There is a bit of a delay between when events are added or updated on The Team Calendar and when they show up in Google Calendar.

Add an Event to the Team Calendar

Any team member can add a new event to the team calendar, and all of these events should be added:

  • Any event, in person or online, to which the full team or a resource group is invited to attend
  • Any event that takes place at OES
  • Any event where SAR or County insurance may apply if someone is injured
  • Any event where a sign in is desired

FIRST, make sure the event does not already exist on the Team Calendar. If not, follow the steps below to add a new event:

  1. Navigate to the Team Calendar.
  2. At the bottom of the page, click the "Add New Event" button
  3. Enter a Title, Date, Start Time and End Time. Optionally, check the All day checkbox.
  4.  Event Type: The types available map to these Time Type definitions.
  5. Associated Resource: If this event is associated with a resource (e.g. Hasty), choose this from the dropdown list. 
  6. Location Map (optional): You have 3 options for entering a location:
    1. Enter an address in the Geocode address field. This will automatically update the map, as well as the Latitude and Longitude based on the address you select.
    2. You can grab the location marker on the map and drag it to a different location. After placing the marker, click the "Place Marker Here" button. This will update the Geocode address, Latitude and Longitude fields.
    3. You can enter Latitude and Longitude directly, which will automatically update the map and Geocode address field.
  7. Additional Location Information: Add more specific location information other than (or in addition to) an address, such as OES Classroom, or OES Lower Lot.
  8. Add an optional Description, to give team members more information about the event.
  9. Signup Genius Link: If your event has a Signup Genius option, you can add the link in the URL field. If there are more than one links, use the "Add another item" button to add another URL.
  10. Click the "Save" button at the top of the page.

Recurring Events

The Team Calendar does not support recurring events, but you can "clone" an event to create a copy. If you do not have access to clone an event, please email help@contracostasar.org.

To clone an event:

  1. Go to the event page that you want to copy.
  2. Click the "Clone" tab under the title of the page.
  3. Accept the default settings here and click "Clone".
  4. Now you will see your NEW event. Click the "Edit" tab to update the details for this event. 
  5. At the top of the page near the "Save" button, toggle the "Published" option.
  6. Click "Save".